![]()
Important Note
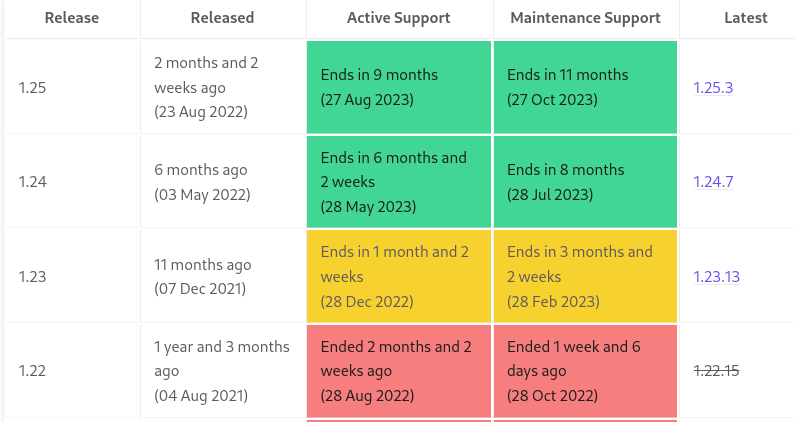
This document is based on Kubeflow 1.6, the current stable release at the time of writing this document.
It’s important notice that the Kubernetes version supported by Kubeflow 1.6 is: Kubernetes 1.22.x
Unfortunately this Kubernetes version is deprecated, more information here
Introduction
Machine learning development or model development essentially follows the path: data -> information -> knowledge -> insight. Model development life cycle (MDLC) is a term commonly used to describe the flow between training and inference.
Kubeflow is a collection of cloud native tools for all of the stages of MDLC (data exploration, feature preparation, model training/tuning, model serving, model testing, and model versioning). Kubeflow also has tooling that allows these traditionally separate tools to work seamlessly together. An important part of this tooling is the pipeline system, which allows users to build integrated end-to-end pipelines that con‐ nect all components of their MDLC.
The Kubeflow project was first announced at KubeCon + CloudNativeCon North America 2017 by Google engineers David Aronchick, Jeremy Lewi, and Vishnu Kannan.
Kubeflow started as an open sourcing of the way Google ran TensorFlow internally, based on a pipeline called TensorFlow Extended (TFX). It began as just a simpler way to run TensorFlow jobs on Kubernetes, but has since expanded to be a multi-architecture, multi-cloud framework for running end-to-end machine learning workflows.
Installation
In this section we are going to install Kubeflow by means of Kubernetes manifests, this installation procedure is considered an advanced method.
The best approach for using persistence in Kubeflow is make available any kind of dynamic provisioning. For example with can use for simplicity the NFS subdir external provisioner. For make available automatically for Kubeflow, we have to setup this provisioner as the default providioner:
kubectl patch storageclass nfs-client -p '{"metadata": {"annotations":{"storageclass.kubernetes.io/is-default-class":"true"}}}'
Just in case we have tried install Kubeflow and the default provisioner is not configured in our cluster, we will have to modified manually the persistence of Kubeflow with the following commans:
kubectl get pvc/authservice-pvc -n istio-system -o yaml > authservice-pvc.yaml
kubectl get pvc/katib-mysql -n kubeflow -o yaml > katib-mysql.yaml
kubectl get pvc/minio-pvc -n kubeflow -o yaml > minio-pvc.yaml
kubectl get pvc/mysql-pv-claim -n kubeflow -o yaml > mysql-pv-claim.yaml
We have to edit the PVC, for example:
apiVersion: v1
kind: PersistentVolumeClaim
metadata:
  name: mysql-pv-claim
spec:
  accessModes:
  - ReadWriteOnce
  resources:
    requests:
      storage: 20Gi
  storageClassName: nfs-client <=======
The following the installation itself using the manifests and Kustomize tool:
git clone https://github.com/kubeflow/manifests.git
git checkout tags/v1.6.1 -b v1.6.1
cd manifests
while ! kustomize build example | kubectl apply -f -; do echo "Retrying to apply resources"; sleep 10; done
The kustomize command will raise errors because of un-ordered manifest application, however finally with some retry the Kubeflow system will be installed successfuly.
Port-Forward
The default way of accessing Kubeflow is via port-forward. This enables you to get started quickly without imposing any requirements on your environment. Run the following to port-forward Istio’s Ingress-Gateway to local port 8080:
kubectl port-forward svc/istio-ingressgateway -n istio-system 8080:80
After running the command, you can access the Kubeflow Central Dashboard by doing the following:
- Open your browser and visit
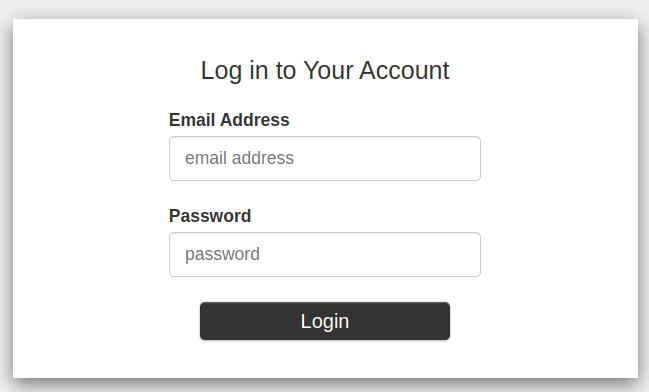
http://localhost:8080. You should get the Dex login screen. - Login with the default user’s credential. The default email address is
user@example.comand the default password is12341234.
Add users (static password)
We will have by default this user email (user@example.com) and password (12341234).
To access the Kubeflow Central Dashboard, you need to connect to the Istio gateway that provides access to the Kubeflow service mesh.
The endpoint by default for logging in is:
k get svc -n istio-system | grep NodePort
istio-ingressgateway    NodePort    10.99.109.239   <none>        15021:30585/TCP,80:32223/TCP,443:30541/TCP,31400:31880/TCP,15443:31005/TCP
http://worker-node-ip:32223
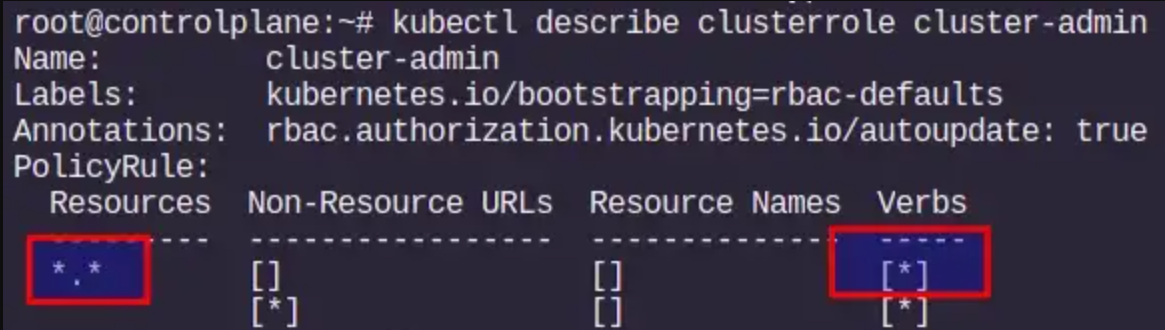
An administrator can manually create a profile for any user in the Kubeflow cluster. Here an administrator is a person who has cluster-admin role binding in the Kubernetes cluster. This person has permissions to create and modify Kubernetes resources in the cluster. For example, the person who deployed Kubeflow will have administration privileges in the cluster.
Note: For checking the cluster-admin role for the current user
kubectl describe clusterrole cluster-admin
Adding a new user into Kubeflow is adding a new Profile (a dedicated NameSpace for this new user):
Step 1: Create a new profile
cat add-new-profile-kubeflow.yaml

apiVersion: kubeflow.org/v1beta1
kind: Profile
metadata:
  name: kubeflow-ns01
spec:
  owner:
    kind: User
    name: superuser@example.com

k apply -f profile-kubeflow.yaml
Step 2: Add new static user and password
k get cm dex -n auth -o jsonpath='{.data.config\.yaml}' > dex.yaml

vim dex.yaml
[---]
staticPasswords:
- email: user@example.com
  hash: $2y$12$4K/VkmDd1q1Orb3xAt82zu8gk7Ad6ReFR4LCP9UeYE90NLiN9Df72
  # https://github.com/dexidp/dex/pull/1601/commits
  # FIXME: Use hashFromEnv instead
  username: user
  userID: "15841185641784"
- email: superuser@example.com
  hash: $2y$12$4K/VkmDd1q1Orb3xAt82zu8gk7Ad6ReFR4LCP9UeYE90NLiN9Df72
  # https://github.com/dexidp/dex/pull/1601/commits
  # FIXME: Use hashFromEnv instead
  #hashFromEnv: "SUPERUSER_PASSWORD"
  username: superuser
[---]

k create cm dex --from-file=config.yaml=dex.yaml -n auth --dry-run=client -o yaml | kubectl apply -f -
k rollout restart deployment dex -n auth
Note: https://bcrypt-generator.com/
Multi Tenancy Approach
In Kubeflow clusters, users often need to be isolated into a group, where a group includes one or more users. Additionally, a user may need to belong to multiple groups. Kubeflow’s multi-user isolation simplifies user operations because each user only views and edited\s the Kubeflow components and model artifacts defined in their configuration. A user’s view is not cluttered by components or model artifacts that are not in their configuration. This isolation also provides for efficient infrastructure and operations i.e. a single cluster supports multiple isolated users, and does not require the administrator to operate different clusters to isolate users.
The key concepts regarding this topic are:
- Administrator: An Administrator is someone who creates and maintains the Kubeflow cluster. This person configures permissions (i.e. view, edit) for other users.
- User: A User is someone who has access to some set of resources in the cluster. A user needs to be granted access permissions by the administrator.
- Profile: A Profile is a unique configuration for a user, which determines their access privileges and is defined by the Administrator.
- Isolation: Isolation uses Kubernetes Namespaces. Namespaces isolate users or a group of users.
- Authentication: Authentication is provided by an integration of Istio and OIDC and is secured by mTLS.
- Authorization: Authorization is provided by an integration with Kubernetes RBAC.
Kubeflow multi-user isolation is configured by Kubeflow administrators. Administrators configure Kubeflow User Profiles for each user. After the configuration is created and applied, a User can only access the Kubeflow components that the Administrator has configured for them. The configuration limits non-authorized UI users from viewing or accidentally deleting model artifacts.
With multi-user isolation, Users are authenticated and authorized, and then provided with a time-based token i.e. a json web token (JWT). The access token is carried as a web header in user requests, and authorizes the user to access the resources configured in their Profile. The Profile configures several items including the User’s namespace(s), RBAC RoleBinding, Istio ServiceRole and ServiceRoleBindings along with Resource Quotas and Custom Plug-ins.
An example of all of this here
As example of creating user Profile, we can define the limits allowed for the user with standard NameSpace quotas:
apiVersion: kubeflow.org/v1beta1
kind: Profile
metadata:
  name: profileName   # replace with the name of profile you want, this will be user's namespace name
spec:
  owner:
    kind: User
    name: userid@email.com   # replace with the email of the user

  resourceQuotaSpec:    # resource quota can be set optionally
   hard:
     cpu: "2"
     memory: 2Gi
     persistentvolumeclaims: "1"
     requests.nvidia.com/gpu: "1"
     requests.storage: "5Gi"
Setting Up Your Kubeflow Development Environment
Setup a Kubeflow development environment is to setup Kubeflow Pipelines environment.
Kubeflow Pipelines is a platform for building and deploying portable, scalable machine learning (ML) workflows based on containers.
The Kubeflow Pipelines platform consists of:
- A user interface (UI) for managing and tracking experiments, jobs, and runs.
- An engine for scheduling multi-step ML workflows.
- An SDK for defining and manipulating pipelines and components.
- Notebooks for interacting with the system using the SDK.
In particular a pipeline is a description of a machine learning (ML) workflow, including all of the components in the workflow and how the components relate to each other in the form of a graph. The pipeline configuration includes the definition of the inputs (parameters) required to run the pipeline and the inputs and outputs of each component.
When you run a pipeline, the system launches one or more Kubernetes Pods corresponding to the steps (components) in your workflow (pipeline). The Pods start containers, and the containers in turn start your programs.
After developing your pipeline, you can upload your pipeline using the Kubeflow Pipelines UI or the Kubeflow Pipelines SDK.
Kubeflow Pipelines SDK
The Kubeflow Pipelines SDK provides a set of Python packages that you can use to specify and run your machine learning (ML) workflows.
So Kubeflow’s pipeline system is built in Python, and having the SDK installed locally will allow you to build pipelines faster. However, if you can’t install software locally, you can still use Kubeflow’s Jupyter environment to build your pipelines.
Kubeflow Pipelines CLI tool
conda create -n kfenv python=3
conda env list
conda activate kfenv
(kfenv) pip install kfp
(kfenv) kfp
(kfenv) conda deactivate