![]()
Service Mesh
Istio is an open source implementation of a service mesh. A service mesh is a relatively recent term used to describe a decentralized application networking infrastructure that allows applications to be secure, resilient, observable, and controllable. It describes an architecture made up of a data plane that uses application layer proxies to manage networking traffic on behalf of an application and a control plane to manage proxies.
The Istio project was started by teams from Google and IBM in partnership with the Envoy (the proxy) team from Lyft.
Istio is intended for microservices or service-oriented architecture (SOA)-style architectures, but it is not limited to those.
Not only microservices
Istio’s power shines as you move to architectures that experience large numbers of services, interconnections, and networks over unreliable cloud infrastructure.
Furthermore, since Istio runs out-of-process from the application, it can be deployed to existing legacy or brownfield environments as well, thus incorporating those into the mesh.
For example, if you have existing monolith deployments, the Istio service proxy can be deployed alongside each monolith instance and will transparently handle network traffic for it. At a minimum, this can add request metrics that become very useful for understanding the application’s usage, latency, throughput, and failure characteristics. Istio can also participate in higher-level features like policy enforcement about what services are allowed to talk to it.
Architecture overview
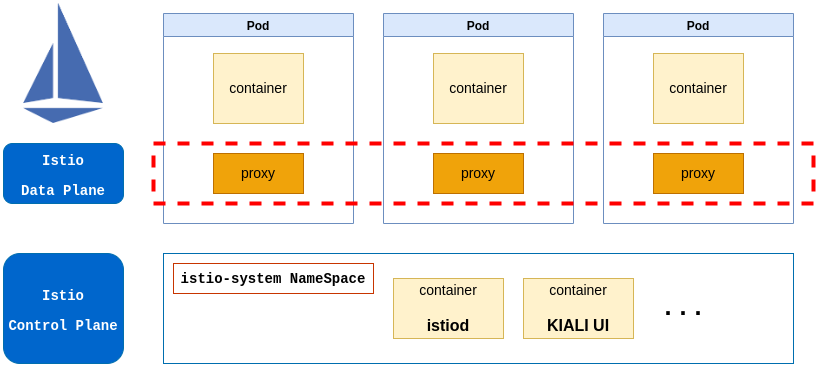
Istio is an implementation of a service mesh with a Data Plane based on Envoy (proxy in the picture) and a Control Plane (istio-system namespace in the picture).
The data plane, which is composed of service proxies that are deployed alongside applications and complement them by implementing policies, managing traffic, generating metrics and traces, and much more. Istio uses Envoy as its service proxy due to its versatility and because it can be dynamically configured.
The control plane, which exposes an API for operators to manipulate the data plane’s network behavior.
Installation
Istioclt download
Option 1
Download istioctl from the Istio release page.
tar xvzf istioctl-1.15.3-linux-amd64.tar.gz
Option 2
curl -L https://istio.io/downloadIstio | ISTIO_VERSION=1.13.0 sh -
istio-1.13.0/bin/istioctl version --remote=false
In order to use the command regularly you have to configure KUBECONFIG variable so “istioctl” can communicate with the Kubernetes cluster.
This is a basic (the minimal) installation of Istio, the UI, Grafana and other components have to be installed manually.
Configuration Profiles
Installation using Configuration Profiles.
The built-in configuration profiles that can be used when installing Istio. The profiles provide customization of the Istio control plane and of the sidecars for the Istio data plane.
You can start with one of Istio’s built-in configuration profiles and then further customize the configuration for your specific needs. The following built-in configuration profiles are currently available:
- default: This is the same as “istioctl install”. This profile is recommended for production deployments and for primary clusters.
- demo: This profile enables high levels of tracing and access logging so it is not suitable for performance tests. This profile is recommend for testing the platform itself, selt-training and study.
- minimal: same as the default profile, but only the control plane components are installed. This allows you to configure the control plane and data plane components (e.g., gateways) using separate profiles.
There are other profiles, such as external, empty, preview and so on.
istioctl profile list
istioctl install --set profile=default
istioctl install --set profile=demo
We can change from one profile to another, the istioctl command will remove the unnecessary components (or will add) from one profile to the other.
Profile customization
istioctl profile dump demo > demo_settings.yaml
(custom mofifications here)
istioctl install -f demo_settings.yaml
You can not use the standard kubectl (because this yaml doesn’t have the CRD definitions).
The way of creating a full yaml files for deploying istio is:
istioctl profile dump demo > demo_settings.yaml
(custom mofifications here)
istioctl manifest generate -f demo_settings.yaml > all_istio_manifests.yaml
kubectl apply -f all_istio_manifests.yaml
NOTE: Anyway you will have problems using kubectl, one of them is you have to create the istio-system NameSpace (is not included in the yaml), and you have to create the CRD before creating the objects, so you will get errors.
Istio Integrations
You can extend Istio with other tools, a list a components for adding extra functionality to Istio is listed here.
An example of providing additional functionality (add Kiali Istio UI):
kubectl apply -f https://raw.githubusercontent.com/istio/istio/release-1.15/samples/addons/kiali.yaml
Enabling Sidecar Injection (Proxies)
The activation of proxy injections (sidecar inside our applications pod automatically) is labeling the NameSpaces. For example in order to enable proxy injection in the “default” namespace:
kubectl describe ns default

Name:         default
Labels:       kubernetes.io/metadata.name=default
Annotations:  <none>
Status:       Active
No resource quota.
No LimitRange resource.
kubectl label ns default istio-injection=enabled
kubectl describe ns default

Name:         default
Labels:       kubernetes.io/metadata.name=default
              istio-injection=enabled
Annotations:  <none>
Status:       Active
No resource quota.
No LimitRange resource.